概念
高阶组件(Higher-Order Components): 能够接受一个组件并返回一个新的组件
高阶组件(HOC)是 React 中用于重用组件逻辑的高级技术
HOC 本身不是 React API 的一部分,是从 React 构思本质中浮现出来的一种模式
高阶组件(HOC)是一个函数,能够接受一个组件并返回一个新的组件
组件是将 props 转化成 UI ,然而高阶组件将一个组价转化成另外一个组件。
相当于高阶组件接收一个组件,然后给组件添加一个data 的props属性 返回出来
1
| const EnhancedComponent = higherOrderComponent(WrappedComponent);
|
之前使用mixins作为解决交叉问题的方法,现在被抛弃了
组件是React中代码重用的最小单元
高阶组件既不会修改输入组件,也不会通过继承来复制行为。
高阶组件是纯函数
高阶组件(HOC)并不关心数据将会如何或者为什么使用,并且被包裹的元素并不关心数据的源头。
高阶组件的实现
1、属性代理:本质上是使用组合的方式,通过将组件包装在容器组件中实现功能
2、反向继承:使用一个函数接受一个组件作为参数传入,并返回一个继承了该传入组件的类组件,且在返回组件的 render() 方法中返回 super.render() 方法
运用了很多AOP切片编程是思想
不要在高阶组件中改变原始组件,而是使用组合
要忍住在高阶组件修改组件原型(或者修改其他)的冲动。
高阶组件最好是通过将输入组件包裹在容器组件的方式来使用组合:
用容器组件组合包裹组件且不修改包裹组件,这才是正确的打开方式
可以将高阶组件视为定义参数化容器组件
给包裹组件传递不相关的属性(Props)
高阶组件可以向组件添加功能。但是他不应该大幅度地改变功能。期望地是高阶组件返回的组件和被包裹组件应具有相似的界面。
高阶组件应该通过props传递那些与特定功能无关的特性
警告
不要在render函数中使用高阶组件
不仅仅关乎于性能,卸载组件会造成组件状态和其子元素全部丢失
1
2
3
4
5
6
7
| render() {
const EnhancedComponent = enhance(MyComponent);
return <EnhancedComponent />;
}
|
静态方法必须复制
1
2
3
4
5
6
7
|
WrappedComponent.staticMethod = function() {}
const EnhancedComponent = enhance(WrappedComponent);
typeof EnhancedComponent.staticMethod === 'undefined'
|
为了解决这个问题,在返回之前,可以向容器组件中复制原有的静态方法:
1
2
3
4
5
6
| function enhance(WrappedComponent) {
class Enhance extends React.Component {}
Enhance.staticMethod = WrappedComponent.staticMethod;
return Enhance;
}
|
然而,上面的方法需要你明确地知道哪些方法需要被复制。你可以使用hoistNonReactStatic()来自动复制非React的静态方法
1
2
3
4
5
6
| import hoistNonReactStatic from 'hoist-non-react-statics';
function enhance(WrappedComponent) {
class Enhance extends React.Component {}
hoistNonReactStatic(Enhance, WrappedComponent);
return Enhance;
}
|
Refs不会被传递
虽然高阶组件是将所有 属性(props) 传递给包裹的组件,但是对 refs 不起作用。 因为 ref 不是一个真正的属性(props) 。
如果你向一个由高阶组件创建的组件的元素添加ref应用,那么ref指向的是最外层容器组件实例的,而不是包裹组件。
解决方法:使用 React.forwardRef (refs转发)
高阶组件的实现(怎么做❓)
属性代理
- 属性代理是最常见的实现方式,它本质上是
使用组合的方式,通过将组件包装在容器组件中实现功能。
- 属性代理方式实现的
高阶组件和原组件的生命周期关系完全是React父子组件的生命周期关系,所以该方式实现的高阶组件会影响原组件某些生命周期等方法
操作 props
最简单的属性代理实现代码如下
1
2
3
4
5
6
7
8
9
10
11
12
13
14
15
|
function HOC(WrappedComponent) {
const newProps = { type: 'HOC' };
return props => <WrappedComponent {...props} {...newProps}/>;
}
function HOC(WrappedComponent) {
return class extends React.Component {
render() {
const newProps = { type: 'HOC' };
return <WrappedComponent {...this.props} {...newProps}/>;
}
};
}
|
从上面代码可以看到,通过属性代理方式实现的高阶组件包装后的组件可以拦截到父组件传递过来的 props,提前对 props 进行一些操作,比如增加一个 type 属性
抽象 state
需要注意的是,通过属性代理方式实现的高阶组件无法直接操作原组件的 state,但是可以通过 props 和回调函数对 state 进行抽象
常见的例子是实现非受控组件到受控组件的转变
1
2
3
4
5
6
7
8
9
10
11
12
13
14
15
16
17
18
19
20
21
22
23
24
25
26
27
28
29
30
31
32
33
34
35
36
|
function HOC(WrappedComponent) {
return class extends React.Component {
constructor(props) {
super(props);
this.state = {
name: '',
};
this.onChange = this.onChange.bind(this);
}
onChange = (event) => {
this.setState({
name: event.target.value,
})
}
render() {
const newProps = {
name: {
value: this.state.name,
onChange: this.onChange,
},
};
return <WrappedComponent {...this.props} {...newProps} />;
}
};
}
@HOC
class Example extends Component {
render() {
return <input name="name" {...this.props.name} />;
}
}
|
获取 refs 引用
为了访问 DOM element (focus事件、动画、使用第三方 DOM 操作库),有时我们会用到组件的 ref 属性。
ref 属性只能声明在 class 类型的组件上,而无法声明在函数类型的组件上(因为无状态组件没有实例)。
通过属性代理方式实现的高阶组件无法直接获取原组件的 refs 引用,但是可以通过在原组件的ref回调函数中调用父组件传入的 ref 回调函数来获取原组件的refs 引用。
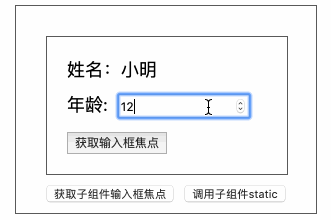
假设有一个 User 组件(原组件),它的代码如下:
1
2
3
4
5
6
7
8
9
10
11
12
13
14
15
16
17
18
19
20
21
22
23
24
25
26
27
28
29
30
31
32
33
34
35
36
37
38
39
40
41
42
43
44
45
46
47
48
49
50
51
52
53
54
55
56
57
58
59
60
61
62
63
64
65
66
67
68
69
70
71
72
73
74
75
76
77
| import * as React from 'react';
import * as styles from './index.module.less';
interface IProps {
name: string;
age: number;
inputRef?: any;
}
class User extends React.Component<IProps> {
private inputElement: any ;
static sayHello () {
console.error('hello world');
}
constructor (props: IProps) {
super(props);
this.focus = this.focus.bind(this);
this.onChange = this.onChange.bind(this);
}
state = {
name: '',
age: 0,
};
componentDidMount () {
this.setState({
name: this.props.name,
age: this.props.age,
});
}
onChange = (e: any) => {
this.setState({
age: e.target.value,
});
}
focus () {
this.inputElement.focus();
}
render () {
return (
<div className={styles.wrapper}>
<div className={styles.nameWrapper}>姓名:{this.state.name}</div>
<div className={styles.ageWrapper}>
年龄:
<input
className={styles.input}
value={this.state.age}
onChange={this.onChange}
type="number"
ref={input => {
if (this.props.inputRef) {
this.props.inputRef(input);
}
this.inputElement = input;
}}
/>
</div>
<div>
<button
className={styles.button}
onClick={this.focus}
>
获取输入框焦点
</button>
</div>
</div>
);
}
}
export default User;
|
通过属性代理方式实现的能获取原组件 refs 引用的高阶组件代码如下:
1
2
3
4
5
6
7
8
9
10
11
12
13
14
15
16
17
18
19
20
21
22
23
24
25
26
27
28
29
30
31
32
33
34
35
36
37
38
39
40
41
| import * as React from 'react';
import * as styles from './index.module.less';
function HOC (WrappedComponent: any) {
let inputElement: any = null;
function handleClick () {
inputElement.focus();
}
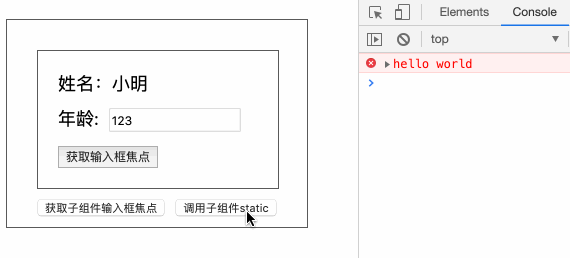
function wrappedComponentStaic () {
WrappedComponent.sayHello();
}
return (props: any) => (
<div className={styles.hocWrapper}>
<WrappedComponent
inputRef={(el: any) => {
inputElement = el;
}}
{...props}
/>
<input
type="button"
value="获取子组件输入框焦点"
onClick={handleClick}
className={styles.focusButton}
/>
<input
type="button"
value="调用子组件static"
onClick={wrappedComponentStaic}
className={styles.callButton}
/>
</div>
);
}
export default HOC;
|
使用:
1
2
3
4
5
6
7
8
9
10
11
12
13
14
| import React from 'react';
import HOC from '../../components/OperateRefsHOC';
import User from '../../components/User';
const EnhanceUser = HOC(User);
class OperateRefs extends React.Component<any> {
render () {
return <EnhanceUser name="小明" age={12} />;
}
}
export default OperateRefs;
|
获取原组件的 static 方法
当待处理组件为 class 组件时,通过属性代理实现的高阶组件(无论是返回一个函数组件 还是返回一个 class 组件),均可以获取到原组件的 static 方法
如上面给出的高阶组件的代码,核心代码如下:
1
2
3
4
5
6
7
8
9
10
11
12
13
14
15
16
17
18
19
20
21
22
23
24
25
26
27
28
29
| import * as React from 'react';
import * as styles from './index.module.less';
function HOC (WrappedComponent: any) {
function wrappedComponentStaic () {
WrappedComponent.sayHello();
}
return (props: any) => (
<div className={styles.hocWrapper}>
<WrappedComponent
inputRef={(el: any) => { inputElement = el; }}
{...props}
/>
<input
type="button"
value="调用子组件static"
onClick={wrappedComponentStaic}
className={styles.callButton}
/>
</div>
);
}
export default HOC;
|
通过 props 实现条件渲染
通过属性代理方式实现的高阶组件无法直接实现对原组件进行渲染劫持(即对原组件内部 render 的控制并不是很强),但可以通过 props 来控制是否渲染及传入数据:
1
2
3
4
5
6
7
8
9
10
11
12
13
14
15
16
17
18
19
20
21
22
23
24
| import * as React from 'react';
import * as styles from './index.module.less';
function HOC (WrappedComponent: any) {
function wrappedComponentStaic () {
WrappedComponent.sayHello();
}
return (props: any) => (
<div className={styles.hocWrapper}>
{
props.isShow ? (
<WrappedComponent
{...props}
/>
) : <div>暂无数据</div>
}
</div>
);
}
export default HOC;
|
用其他元素包裹传入的组件
可以通过类似下面的方式将原组件包裹起来,从而实现布局或者是样式的目的
1
2
3
4
5
6
7
8
9
10
11
| function withBackgroundColor(WrappedComponent) {
return class extends React.Component {
render() {
return (
<div style={{ backgroundColor: '#ccc' }}>
<WrappedComponent {...this.props} {...newProps} />
</div>
);
}
};
}
|
反向继承
反向继承指的是使用一个函数接受一个组件作为参数传入,并返回一个继承了该传入组件的类组件,且在返回组件的 render() 方法中返回 super.render() 方法
1
2
3
4
5
6
7
| const HOC = (WrappedComponent) => {
return class extends WrappedComponent {
render() {
return super.render();
}
}
}
|
- 相较于属性代理方式,使用反向继承方式实现的高阶组件的特点是:
允许高阶组件通过 this 访问到原组件,所以可读可以直接取和操作原组件的 state/ref/生命周期方法。
- 反向继承方式实现的高阶组件可以通过
super.render() 方法获取到传入组件实例的 render 结果,所以可对传入组件进行渲染劫持(最大特点)
- 有条件地展示元素树(element tree)
- 操作由 render() 输出的 React 元素树
- 在任何由 render() 输出的 React 元素中操作 props
- 用其他元素包裹传入组件的渲染结果
劫持原组件生命周期方法
因为反向继承方式实现的高阶组件返回的新组件是继承于传入组件,所以当新组件定义了同样的方法时,将会会覆盖父类(传入组件)的实例方法
1
2
3
4
5
6
7
8
9
10
11
12
13
14
| function HOC(WrappedComponent){
return class HOC extends WrappedComponent {
componentDidMount(){
...
}
render(){
return super.render();
}
}
}
|
虽然生命周期重写会被覆盖,但我们可以通过其他方式来劫持生命周期
1
2
3
4
5
6
7
8
9
10
11
12
13
14
15
16
17
18
19
| function HOC(WrappedComponent){
const didMount = WrappedComponent.prototype.componentDidMount;
return class HOC extends WrappedComponent {
componentDidMount(){
if (didMount) {
didMount.apply(this);
}
...
}
render(){
return super.render();
}
}
}
|
读取/操作原组件的 state
1
2
3
4
5
6
7
8
9
10
11
12
13
14
15
16
17
18
| function HOC(WrappedComponent){
const didMount = WrappedComponent.prototype.componentDidMount;
return class HOC extends WrappedComponent {
async componentDidMount(){
if (didMount) {
await didMount.apply(this);
}
this.setState({ number: 2 });
}
render(){
return super.render();
}
}
}
|
渲染劫持
条件渲染
条件渲染指的是: 可以根据部分参数去决定是否渲染组件(与属性代理方式类似)
1
2
3
4
5
6
7
8
9
10
| const HOC = (WrappedComponent) =>
class extends WrappedComponent {
render() {
if (this.props.isRender) {
return super.render();
} else {
return <div>暂无数据</div>;
}
}
}
|
修改 React 元素树
可以通过 React.cloneElement 方法修改由 render 方法输出的 React 组件树
1
2
3
4
5
6
|
React.cloneElement(
element,
[props],
[...children]
)
|
1
2
3
4
5
6
7
8
9
10
11
12
13
14
15
16
17
18
|
function HigherOrderComponent(WrappedComponent) {
return class extends WrappedComponent {
render() {
const tree = super.render();
const newProps = {};
if (tree && tree.type === 'input') {
newProps.value = 'something here';
}
const props = {
...tree.props,
...newProps,
};
const newTree = React.cloneElement(tree, props, tree.props.children);
return newTree;
}
};
}
|
属性代理和反向继承的对比
通过反向继承方法实现的高阶组件相较于属性代理实现的高阶组件,功能更强大,个性化程度更高
| 功能列表 |
属性代理 |
反向继承 |
| 原组件能否被包裹 |
√ |
√ |
| 原组件是否被继承 |
× |
√ |
| 能否读取/操作原组件的 props |
√ |
√ |
| 能否读取/操作原组件的 state |
乄 |
√ |
| 能否通过 ref 访问到原组件的 dom 元素 |
乄 |
√ |
| 是否影响原组件某些生命周期等方法 |
√ |
√ |
| 是否取到原组件 static 方法 |
√ |
√ |
| 能否劫持原组件生命周期方法 |
× |
√ |
| 能否渲染劫持 |
乄 |
√ |
具体实践
页面复用
想实现页面复用,可以使用属性代理方式实现的高阶组件
假设我们项目中有 pageA 和 pageB 两个 UI 交互完全相同的电影列表页,但由于属于不同的电影类别,数据来源及部分文案有所不同,普通写法可能是这样:
1
2
3
4
5
6
7
8
9
10
11
12
13
14
15
16
17
18
19
20
21
22
23
24
25
26
27
28
29
30
31
32
33
34
35
36
37
38
39
40
41
42
43
44
|
import React from 'react';
import fetchMovieListByType from '../lib/utils';
import MovieList from '../components/MovieList';
class PageA extends React.Component {
state = {
movieList: [],
}
async componentDidMount() {
const movieList = await fetchMovieListByType('comedy');
this.setState({
movieList,
});
}
render() {
return <MovieList data={this.state.movieList} emptyTips="暂无喜剧"/>
}
}
export default PageA;
import React from 'react';
import fetchMovieListByType from '../lib/utils';
import MovieList from '../components/MovieList';
class PageB extends React.Component {
state = {
movieList: [],
}
async componentDidMount() {
const movieList = await fetchMovieListByType('action');
this.setState({
movieList,
});
}
render() {
return <MovieList data={this.state.movieList} emptyTips="暂无动作片"/>
}
}
export default PageB;
|
HOC实现
1
2
3
4
5
6
7
8
9
10
11
12
13
14
15
16
17
18
19
20
21
22
23
24
25
26
27
28
29
30
31
32
33
34
35
36
37
38
39
40
41
42
43
44
45
46
47
48
49
50
|
import React from 'react';
const withFetchingHOC = (WrappedComponent, fetchingMethod, defaultProps) => {
return class extends React.Component {
async componentDidMount() {
const data = await fetchingMethod();
this.setState({
data,
});
}
render() {
return (
<WrappedComponent
data={this.state.data}
{...defaultProps}
{...this.props}
/>
);
}
}
}
import React from 'react';
import withFetchingHOC from '../hoc/withFetchingHOC';
import fetchMovieListByType from '../lib/utils';
import MovieList from '../components/MovieList';
const defaultProps = {emptyTips: '暂无喜剧'}
export default withFetchingHOC(MovieList, fetchMovieListByType('comedy'), defaultProps);
import React from 'react';
import withFetchingHOC from '../hoc/withFetchingHOC';
import fetchMovieListByType from '../lib/utils';
import MovieList from '../components/MovieList';
const defaultProps = {emptyTips: '暂无动作片'}
export default withFetchingHOC(MovieList, fetchMovieListByType('action'), defaultProps);;
import React from 'react';
import withFetchingHOC from '../hoc/withFetchingHOC';
import fetchMovieListByType from '../lib/utils';
import MovieList from '../components/MovieList';
const defaultProps = {...}
export default withFetchingHOC(MovieList, fetchMovieListByType('some-other-type'), defaultProps);
|
上面设计的高阶组件 withFetchingHOC,把变的部分(组件和获取数据的方法) 抽离到外部作为传入,从而实现页面的复用
权限控制
需求
- 多个页面鉴权:鉴权代码不能重复写在页面组件中;
- 不在白名单用户只进行文案提示:鉴权过程业务数据请求之前;
- 一段时间后去掉白名单:鉴权应该完全与业务解耦,增加或去除鉴权应该最小化影响原有逻辑。
封装鉴权流程,利用高阶组件的条件渲染特性,鉴权失败展示相关文案,鉴权成功则渲染业务组件。
属性代理方式实现
1
2
3
4
5
6
7
8
9
10
11
12
13
14
15
16
17
18
19
20
21
22
23
24
25
26
27
28
29
30
31
32
33
34
35
36
37
38
39
40
41
42
43
44
| import React from 'react';
import { whiteListAuth } from '../lib/utils';
function AuthWrapper(WrappedComponent) {
return class AuthWrappedComponent extends React.Component {
constructor(props) {
super(props);
this.state = {
permissionDenied: -1,
};
}
async componentDidMount() {
try {
await whiteListAuth();
this.setState({
permissionDenied: 0,
});
} catch (err) {
this.setState({
permissionDenied: 1,
});
}
}
render() {
if (this.state.permissionDenied === -1) {
return null;
}
if (this.state.permissionDenied) {
return <div>功能即将上线,敬请期待~</div>;
}
return <WrappedComponent {...this.props} />;
}
}
}
export default AuthWrapper;
|
使用反向继承方式实现的高阶组件完成组件渲染性能的追踪
反向继承方式实现的高阶组件能否劫持原组件生命周期方法,因此,利用该特性,我们可以方便的对某个组件的渲染时间进行记录
1
2
3
4
5
6
7
8
9
10
11
12
13
14
15
16
17
18
19
20
21
22
23
24
25
26
27
28
29
30
31
32
33
34
35
36
37
38
| import React from 'react';
class Home extends React.Component {
render () {
return (<h1>Hello World.</h1>);
}
}
function withTiming (WrappedComponent: any) {
let start: number, end: number;
return class extends WrappedComponent {
constructor (props: any) {
super(props);
start = 0;
end = 0;
}
componentWillMount () {
if (super.componentWillMount) {
super.componentWillMount();
}
start = +Date.now();
}
componentDidMount () {
if (super.componentDidMount) {
super.componentDidMount();
}
end = +Date.now();
console.error(`${WrappedComponent.name} 组件渲染时间为 ${end - start} ms`);
}
render () {
return super.render();
}
};
}
export default withTiming(Home);
|
Hook 会替代高阶组件吗?
Hook 是 React 16.8 的新增特性,它可以让我们在不编写 class 的情况下使用 state 以及其他的 React 特性Hook 的出现使得原本许多很别扭的写法变得轻松,最典型的就是它可以取代掉 class 生命周期中大多数的功能,把更相关的逻辑放在一起,而非零散在各个生命周期实例方法中。- 虽然
Hook 能解决许多难题,但这显然并不意味着 Hook 就能取代高阶组件,因为它们其实还是有着各自的优势所在:
- 高阶组件可以做到很轻松地
将外部协议化注入功能到一个基础 Component 中,所以可以用来做插件,对于 Hook 来说,其中间处理过程一定会与目标组件强依赖(不是 Hook 的缺陷,只是 Hook 显然并不是设计来解决插件注入的问题的)。
Hook 更多可以看作是对高阶组件方案的补充,填补了高阶组件不擅长的部分。Hook 的写法可以让代码更加紧凑,更适合做 Controller 或者需要内聚的相关逻辑。
React 官方还没有把 class 从 React 中移除的打算,class 组件和 Hook 完全可以同时存在。
参考文档
- 带着三个问题深入浅出React高阶组件
- 【React深入】从 Mixin 到 HOC 再到 Hook
- React Hooks 之于 HoC 与 Render Props
- React Hooks 你真的用对了吗?
- ECMAScript 6 入门 —— 装饰器